
Users work with various devices on their computers, however not all of them know how to remove them safely afterwards. Before users unplug a removable drive or a storage device from their computers, they should make sure that the device is not saving or transferring information at that very moment. Otherwise they risk losing information. To make users happy and keep the information safe, Windows offers a safe removal of these devices.
Most of the available USB devices can be easily unplugged and removed. The USB devices are the most common connectors nowadays as they are compatible and could be plugged in and then removed from the PC without restarting the computer. When the users are unplugging the storage devices, including external hard drives and USB flash drives, users should make sure that the computer has finished saving the data to the device, before that device is removed. In case the small light on the device is on, the user should wait for several seconds and unplug the device when the light is no longer flashing. In other words, Windows has to be prepared that the device will be disconnected.
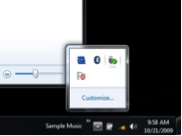
You might see the icon ![]() for Safely Remove Hardware, displayed on the right corner of the taskbar. This means that the device has finished the operations which were in progress and is now ready to be removed. In case the user does not see that icon, he can click on the button ‘Show hidden icons’ and he will see all the icons there.
for Safely Remove Hardware, displayed on the right corner of the taskbar. This means that the device has finished the operations which were in progress and is now ready to be removed. In case the user does not see that icon, he can click on the button ‘Show hidden icons’ and he will see all the icons there.
Look for the Safely Remove Hardware at the far right of the taskbar.
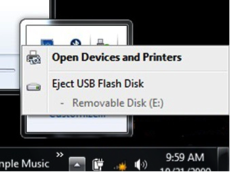
In order for the user to remove the device, he has to click on the icon ![]() Safely Remove Hardware, and then see the device from the list that he wants to remove. In a second Windows will show a notification informing the user that it is safe for the device to be removed. When the users click on the icon
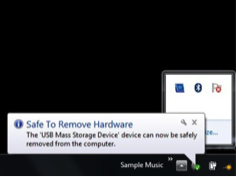
Safely Remove Hardware, and then see the device from the list that he wants to remove. In a second Windows will show a notification informing the user that it is safe for the device to be removed. When the users click on the icon ![]() Safely Remove Hardware, Windows system stores data back on the device and then releases it. If the user removes the device but does not use the feature of the Safely Remove Hardware, then he runs the risk on damaging the files.
Safely Remove Hardware, Windows system stores data back on the device and then releases it. If the user removes the device but does not use the feature of the Safely Remove Hardware, then he runs the risk on damaging the files.
Another way to remove devices from the Computer in a safe manner is to click on the Start button, then click on the Computer and then use a right click on the device, followed by a clock on the Eject.
Safe Removal of Hardware in 3 simple steps
1. Click the Safely Remove Hardware icon in the system tray. Then the pop-up menu appears, search for the device that has to be removed. The icon of the Safely Remove Hardware resembles a USB connector and has a green check mark.
2. Click on the item that you want to remove on the pop-up menu. Windows will release the device.
3. You will see a pop-up message that it is safe to remove the hardware, thus unplug the device.
Repeat the process for each device that has to be removed. Here you can also learn
How to use Snapchat safely and How to protect your Dropbox account